If you’re using a TNT SIM card, you might have already seen the reminders about SIM registration. Whether you’re a new TNT user or you’ve had your number for years, you need to register your SIM card to keep using it, it’s required by law.
In this guide, we’ll walk you through everything you need to know: why SIM registration is important, how to do it online, through the app, or via SMS, what documents you need, and how to fix issues like location errors. Let’s get started.
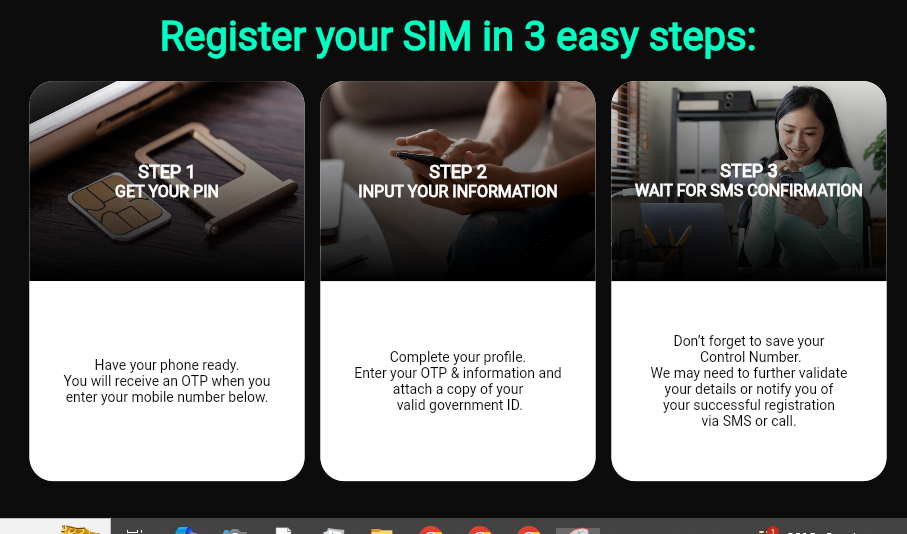
What is TNT SIM Card Registration?
TNT SIM registration is a legal process where you submit your personal information and a valid ID to verify that you’re the rightful owner of the number you’re using. This is part of the SIM Registration Act (Republic Act No. 11934), which applies to all networks in the Philippines, including TNT.
This law aims to reduce crimes like text scams, fraud, and spam by making it easier for authorities to trace phone numbers.
Download the latest version of injector ml skin no ban with updated skins.
Also Read >>>>>>> Dito Sim Registration While managing content for TNT SIM Registrations PH, I also explore tools like Runway ML to understand how emerging AI technologies can inform future-ready digital experiences in telecom.
Why Register Your TNT SIM Card?
Here’s why you must register your TNT SIM:
- To help in the fight against scams and illegal activities
- To avoid automatic deactivation (unregistered SIMs will be permanently deactivated)
- To continue using services like calls, texts, mobile data, and GCash
- To be eligible for promos and rewards
How to register TNT SIM Card?
There are several ways to register your TNT SIM:
- Online through the official registration link
- Via the GigaLife or Smart App
- Through SMS (for basic phones)
- In-person at a Smart Store or authorized registration booth
We’ll explain each method below.
Requirements for TNT SIM Registration Card
Before you begin, make sure you have the following:
- Your TNT SIM card inserted in your phone
- A strong signal or internet connection
- A valid government-issued ID (like a National ID, Driver’s License, or Passport)
- A clear selfie photo for verification
For Foreign Nationals:
Foreigners using TNT SIMs also need:
- Proof of address (like hotel booking or lease)
- Passport
- Visa or Alien Certificate of Registration
TNT SIM Registration Online Guide
Visit the Official Web Portal
Go to the TNT SIM registration website at simreg.smart.com.ph .

OTP Verification
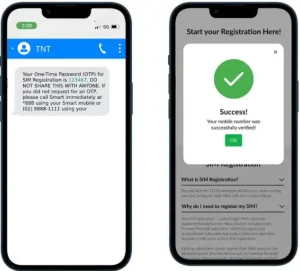
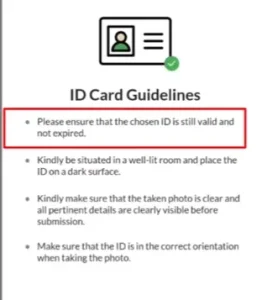
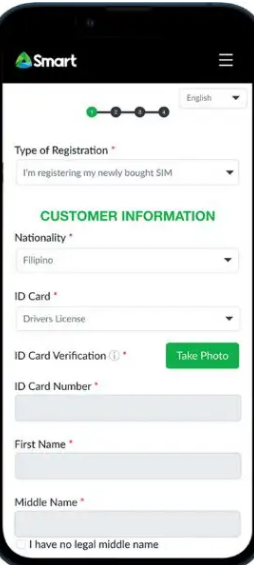
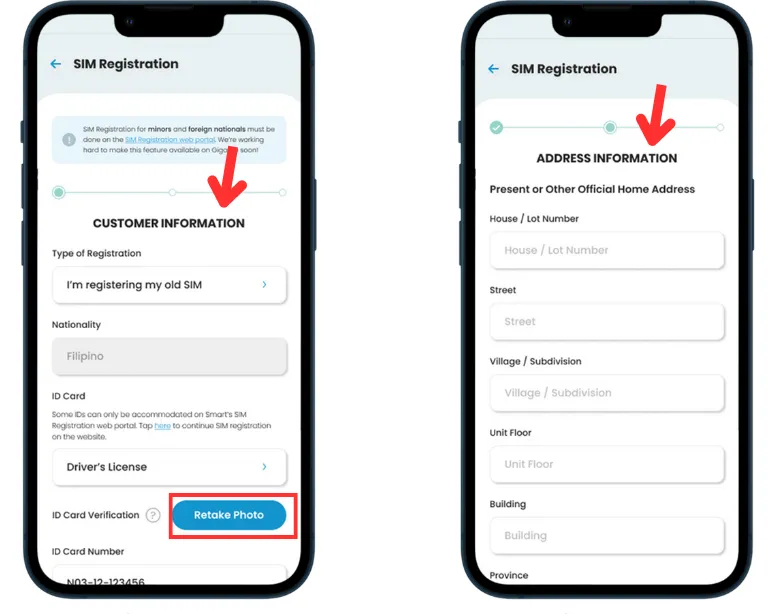
Provide Customer Information


Upload Valid ID and Verification
- Upload a photo of a valid ID (e.g., Driver’s License, PRC ID, TIN ID).
- Upload a selfie for face verification.


Enter Personal Details
Input personal information such as your name, birthdate, gender, and address (house number, street, city, etc.).
Submit Registration
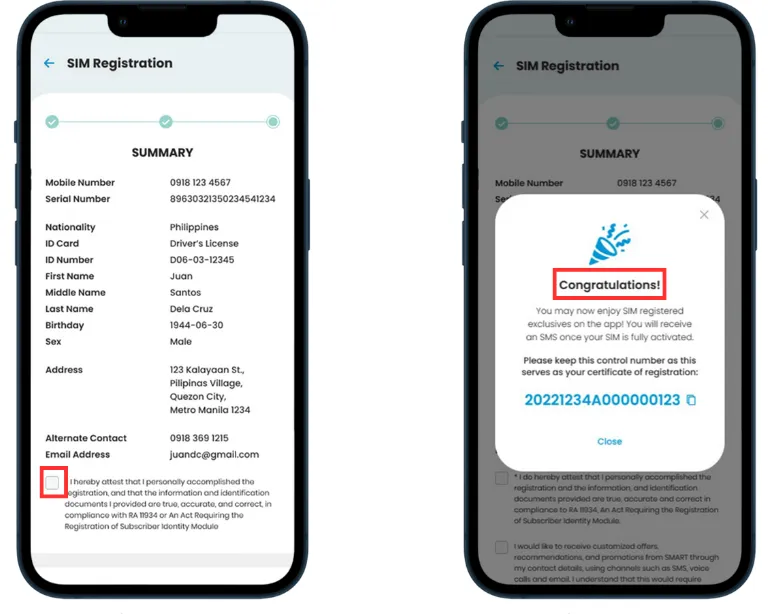
- Review the provided information.
- Submit the form.
Confirmation
- A confirmation message will be sent to your mobile number.
- Save the control number for future reference.
Sim Registration via GigaLife/Smart App
If you already use the GigaLife App (available on Android and iOS), you can register there too.
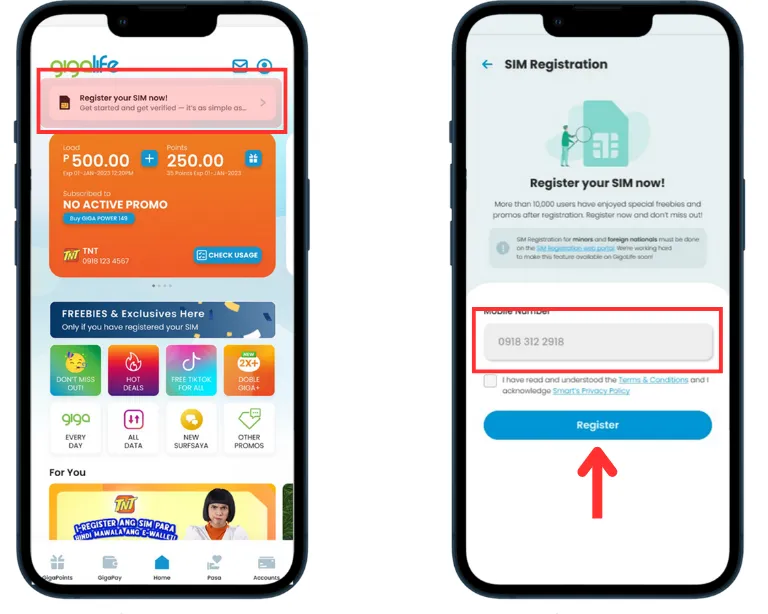
- Download & Install the App. Visit the Play Store or App Store. Download and install the GigaLife or Smart App.
- Open the App and Begin Registration: Launch the app and click on the “Register Your SIM Now” banner. Enter your TNT SIM card number. Agree to the terms by checking the box.
- Verify via OTP: Receive an OTP on your phone. Enter the OTP code and click “Proceed.”
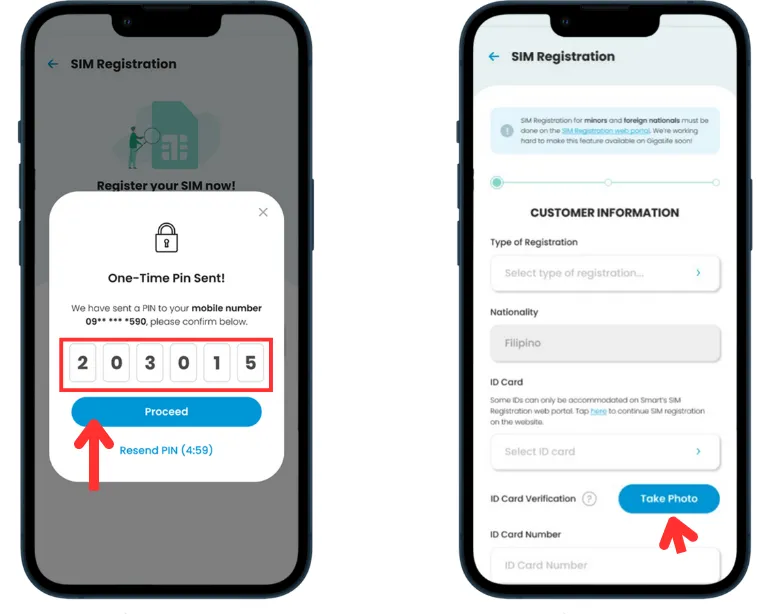
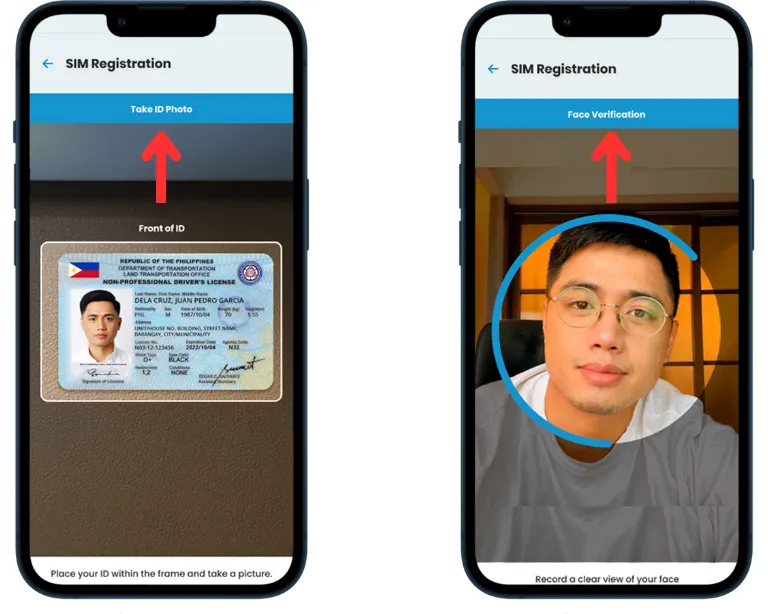
- Upload ID and Photo: Select a Government-issued ID and upload a clear photo, Take and upload a selfie for face verification.
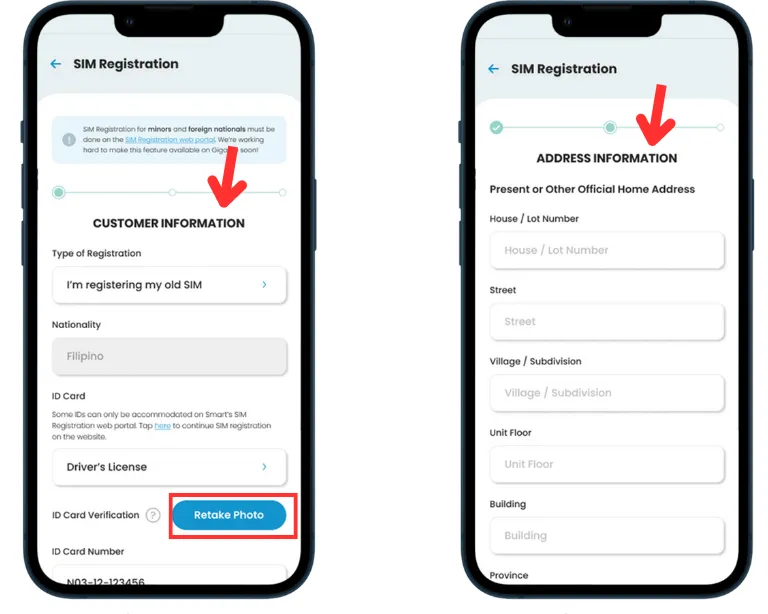
- Provide Customer and Address Information: Choose the type of registration: new or old SIM, Enter your address details, including house number, street, and city.
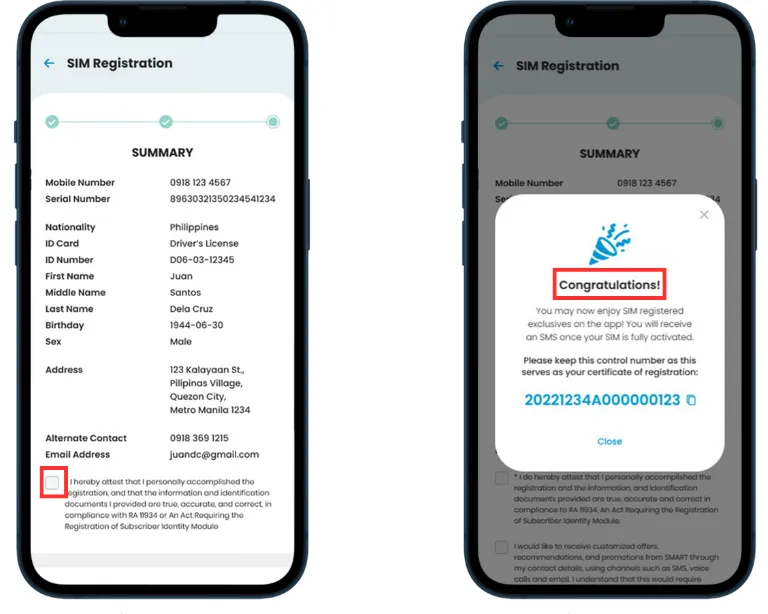
- Review and Submit: Review the summary of your entered information, Check the box to confirm the provided information is correct, and Submit the form.
- Confirmation: Receive a confirmation message on your phone confirming successful registration.
Read More >>>>>>>>> TNT SIM Roaming Promos
Registration via SMS
This is mainly for basic or keypad phones that don’t have access to the internet.
Steps (for feature phones only):
- Open your phone’s Messages app.
Create a new message.
Type the registration format in the message body: REG <Full Name>,<Birthday>,<Gender>,<Complete Address> - Examp REG Juan Dela Cruz,01/01/1990,Male,123 Rizal St. Quezon Cityle
- Send the message to 8888 (official TNT registration number).
- Wait for a confirmation message from TNT. If you receive an error, review the format and try again.
⚠️ This method may not be available in all locations or might only work temporarily. The online method is still preferred.
Alternative Methods to Register Your TNT SIM Card
If online registration isn’t your preference, TNT offers other convenient options:
Via the GigaLife or Smart App
- Download the App: Install the GigaLife or Smart App from the Google Play Store or Apple App Store.
- Log In or Sign Up: Use your TNT number to log in or create a new account.
- Find SIM Registration: Navigate to the “SIM Registration” section in the app.
- Follow Steps: Enter your details, upload your ID, take a selfie, and submit the form as guided.
- Confirmation: Receive a control number and confirmation SMS upon completion.
Via SMS (For Keypad Phones)
- Text “REG” followed by your 11-digit TNT mobile number to 5858 (e.g., REG 0917XXXXXXX).
- Follow the instructions sent via SMS to provide your details and complete the registration.
- You may need to answer security questions or provide a verification code.
In-Person at a Smart Store
- Visit an authorized Smart Store or TNT retailer. Find the nearest location at smart.com.ph/Pages/store-locations.
- Bring your TNT SIM and a valid ID.
- A customer service representative will assist you in filling out the registration form and verifying your identity.
- Receive confirmation and immediate activation upon completion.
Via Smart Hotline
- Dial 888 from your TNT SIM or (02) 8888-1111 from another number.
- Speak to a customer service agent and provide the required information to register your SIM.
Steps to Solve SIM Registration Location Issues
- Visit the Appointment Page: Go to the link: smart.com.ph/Pages/store-locations to start solving your location error.
- Select Your City: Pick the city where you want to register your SIM.
- Book an Appointment: Click on the “Book Appointment” button to schedule your registration.
- Choose Your Appointment Type: You can choose either a Virtual appointment or an In-store appointment to complete the process.
Common Issues and Troubleshooting Tips
Here are common problems and how to fix them:
| Problem | Solution |
|---|---|
| No OTP received | Restart phone, wait a few minutes, or check signal |
| ID not accepted | Use a valid and clear photo of accepted ID |
| Selfie upload fails | Make sure the photo is not blurry or dark |
| Site not loading | Use a different browser or try during off-peak hours |
Rewards After TNT SIM Registration
Yes, TNT still provides free rewards after SIM registration.
For Existing TNT Users:
3 GB of free data
Unlimited calls and texts to all networks
For New TNT SIM Users:
Up to 21 GB of free data
Unlimited calls and texts
Bonus offers when you top-up ₱200 within 7 days and log in to the GigaLife App
Reward Delivery:
These rewards are automatically applied after successful SIM registration.
How to Check Your Rewards:
- Check your text inbox for a confirmation and reward message
- Open the GigaLife App to view your free data and promos
- Dial *123# to check balance and offers
Important Note:
Promos like UnliData 225 and Magic Data may still be available, but they are not always guaranteed. Availability depends on your SIM activity, location, and current promo cycles
FAQs
Conclusion
Registering your TNT SIM is not just about following the law — it’s also about keeping your mobile number, data, load, and apps safe. Whether you use your SIM for study, work, or fun, don’t risk losing it.
Just follow the simple steps in this guide and register online, via app, SMS, or in-person — whichever works best for you.
